
Du tust Dich schwer bei der Nutzung von InDesign oder Illustrator? Du würdest gerne Deine Druckdaten richtig anlegen, hast aber keine Ahnung wie du den Beschnitt für Deine Druckdatei einstellen sollst?
Dann haben wir hier genau das Richtige für Dich!
Wir haben Dir hier eine kleine Anleitung zusammengestellt. Damit solltest Du das Problem in den Griff bekommen. :)
Beginnen wir mit InDesign.
Schritt 1: Das Dokument über Datei > Neu > Dokument einrichten und unter "Anschnitt und Infobereich" 3mm Beschnitt eingeben.

Schritt 2: Im normalen Modus wird Dir jetz ein roter Rahmen angezeigt, der den Beschnitt markiert.
Jetzt ist es wichtig, dass Du alle Bilder und Grafiken bis mindestens an den roten Rand platzierst. Ansonsten können nämlich weiße Blitzer entstehen.

Schritt 3: Beim Exportieren als PDF unter dem Menüpunkt "Marken und Aschnitt" das Häkchen bei "Anschnitteinstellungen des Dokuments verwenden". Achte darauf kein Häkchen bei Marken zu setzen.

In Illustrator sieht die ganze Sache ähnlich aus.
Schritt 1: Lege ein neues Dokument an (Datei > Neu).
Anschließend gibst Du unter "Anschnitt" 3mm Beschnitt an.

Schritt 2: Im normalen Modus wird Dir jetzt ein roter Rahmen angezeigt, der den Beschnitt markiert.
Jetzt ist es wichtig, dass Du alle Bilder und Grafiken bis mindestens an den roten Rahmen platzierst. Ansonsten können weiße Blitzer entstehen.

Schritt 3: Beim exportieren als PDF unter dem Menüpunkt "Marken und Anschnitt" das Häkchen bei "Anschnitteinstellungen des Dokuments verwenden". Achte darauf kein Häkchen bei Marken zu setzen.

Fertig!
Du würdest gerne Deine Flyer mit einer Veredelung aufpeppen hast aber keine Ahnung wie du die Volltonfarbe für eine Veredelung anlegst? Du tust Dich schwer mit Programmen, wie InDesign und Illustrator?
Dann haben wir hier genau das Richtige für Dich!
Wir haben Dir eine kleine Anleitung zusammengestellt. Damit solltest Du das Problem in den Griff bekommen. :)
Schritt 1: Erstelle Dein Wunschprodukt mit Layout, Grafik- und Textelementen.
Schritt 2: Als nächstes erstellst Du eine neue Ebene. Hierzu gehst Du auf "Ebenen" und klickst auf "Neue Ebene erstellen". Anschließend benennst Du sie um (Doppelklick auf Ebene):
Ebene 1 > "Drucken"
Ebene 2 > "Veredelung"
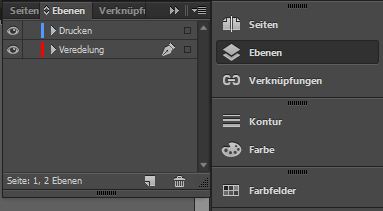
Schritt 3: Auf dieser neuen Ebene ("Veredelung") fügst Du jetzt alle Elemente ein, die Du veredeln möchtest. Am einfachsten geht das, wenn Du die entsprechenden Elemente aus der "Drucken"-Ebene in die "Veredelung"s-Ebene kopierst und an der "Originalposition einfügst" (Rechtsklick, dann erscheint die Option).
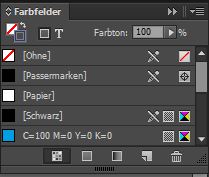
Schritt 4: Im Fenster "Farbfelder" ein "Neues Farbfeld" erstellen.
Schritt 5: Im Fenster "Neues Farbfeld" (Doppelklick auf neues Farbfeld) den Farbtyp "Vollton" auswählen, den Farbmodus "CMYK" wählen und den Magenta-Farbkanal auf 100 % stellen.
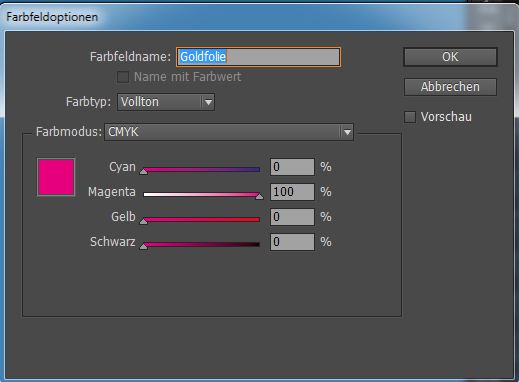
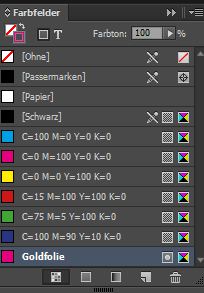
Dem Farbfeld einen Namen geben (z. B. "Goldfolie"). Im Fenster "Farbfelder" erscheint jetzt der zusätzliche Farbkanal.
Wichtig hierbei: Bitte nur die folgenden Benennungen für Sonderfarben verwenden: Goldfolie, Silberfolie, Kupferfolie, Relieflack oder UV-Lack.
Jede andere Bezeichnung wird von der Scodix nicht erkannt!
Schritt 6: Die Elemente auf der neuen Ebene, die veredelt werden sollen, mit diesem neuen Farbkanal einfärben und abschließend im Fenster Attribute auf "Fläche überdrucken" bzw. "Kontur überdrucken" stellen. Dazu einfach die entsprechenden Elemente markieren und ein Häkchen in das jeweilige Feld setzen.

Schritt 7: Achte beim Exportieren darauf, dass in der Rubrik "Ausgabe" unter "Farbkonvertierung" der Befehl "Keine Farbkonvertierung" eingestellt ist. Um das zu kontrollieren öffnest du den Druckfarben-Manager", wo unter "Druckfarbe" der neue Farbkanal aufgeführt sein sollte.
Un wenn Du schon dabei bist, kannst Du auch sicherstellen, dass kein Häkchen bei "Alle Volltonfarben in Prozessfarben umwandeln" gesetzt ist.
Fertig! Jetzt sollte Deinen Veredelungen nichts mehr im Wege stehen.
Du würdest gerne Deine Flyer mit einer Veredelung aufpeppen hast aber keine Ahnung wie du die Volltonfarbe für eine Veredelung anlegst und auf Überdrucken stellst? Du tust Dich schwer mit Programmen, wie InDesign und Illustrator?
Dann haben wir hier genau das Richtige für Dich!
Wir haben Dir hier eine kleine Anleitung zusammengestellt. Damit solltest Du das Problem in den Griff bekommen. :)
Schritt 1: Alle zu veredelnden Elemente auf einer separaten Ebene "Veredelung" anlegen.
Schritt 2: Die Farbe, je nach Veredelungsoption, benennen und als Volltonfarbe (Farbwert: 100 % Magenta) anlegen.
Beispiel: Goldfolie

Schritt 3: Wenn Du Deine Druckprodukte veredeln möchtest, musst Du darauf achten, dass die "Überdrucken"-Option für die entsprechenden Elemente ausgewählt ist.
Wir empfehlen Dir außerdem die Überdruckenvorschau zu aktivieren, dann kannst Du noch bevor Du die Datei drucken lässt kontrollieren, ob das Endergebnis so aussieht, wie Du das wolltest.
InDesign:
1. Überdruckenvorschau in der Menü-Ansicht aktivieren (Strg+Alt+Umschalttaste+Y)
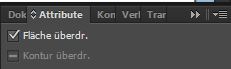
2. Wähle das gewünschte Element aus (in unserem Fall das Farbfeld mit der angelegten Volltonfarbe) das alle anderen Elemente überdrucken soll und setze das Häkchen im Attribute-Fenster bei "Fläche überdrucken". Ggf. kann es auch "Kontur überdrucken" heißen.
Zum Attribute-Fenster kommst Du so: "Fenster" > "Ausgabe" > "Attribute"

Illustrator:
Vom Ablauf ist es hier genauso, wie in InDesign. Nur die Bedienfelder sehen etwas anders aus.
1. Überdruckenvorschau im Ansicht-Menü aktivieren (Strg+Alt+Umschalttaste+Y)
2. Das Farbfeld "Sonderfarbe" auswählen und im Attribute-Fenster das Häkchen bei "Fläche überdrucken" setzen.
Fertig! Jetzt steht Deiner Veredelung nichts mehr im Wege.